
Automate, Streamline and Track financial information through NetSuite Bank Feeds SuiteApp for free. It is an excellent opportunity for NetSuite users to utilize this integration to upload the bank data or even the credit card data directly from the financial institutions. If you are planning to track daily processed and cleared banking transactions, you can get it over a click.
The primary advantages of NetSuite Bank Feeds setup are
- You will be connected to multiple financial institutions through one platform
- Auto import of Bank data
- Update bank account balances daily
- Streamline the process of Bank reconciliations
- Ultimate security is similar to the premium banks
As a NetSuite customer, you can use SuiteApps for your current business needs. NetSuite Bank Feeds SuiteApp, is a clinical move towards bank transaction and update automation.
Why Should One Need Bank Feeds SuiteApp?
It is a sheer convenience to access your banking information as you grant access to your bank’s portal. The automation services offered by SuiteApp help you get information instantly. More importantly, if you have multiple bank accounts and credit cards, NetSuite Accounting services shall be of more excellent help to individuals and large corporations. Because the App and its developments as and when there is an update being free, the NetSuite users shall have comprehensive support in their organization’s growth and productivity.
As such, you are configuring a financial institution to connect it with the application is so easy that you can get it done in minutes. At the same time, even if the account is protected with multi-factor authentication, you can still import the data quicker than the actual bank’s website. Tracking of transactions gives utmost clarity of all the information about income and expenditure too.
How Does SuiteApp Function? And Where Do I find it?
Of course, you need to install the App. This article has step-by-step information to install the app too. Once you have installed the application, the bank feed and the linked banks are provisioned to your NetSuite account.
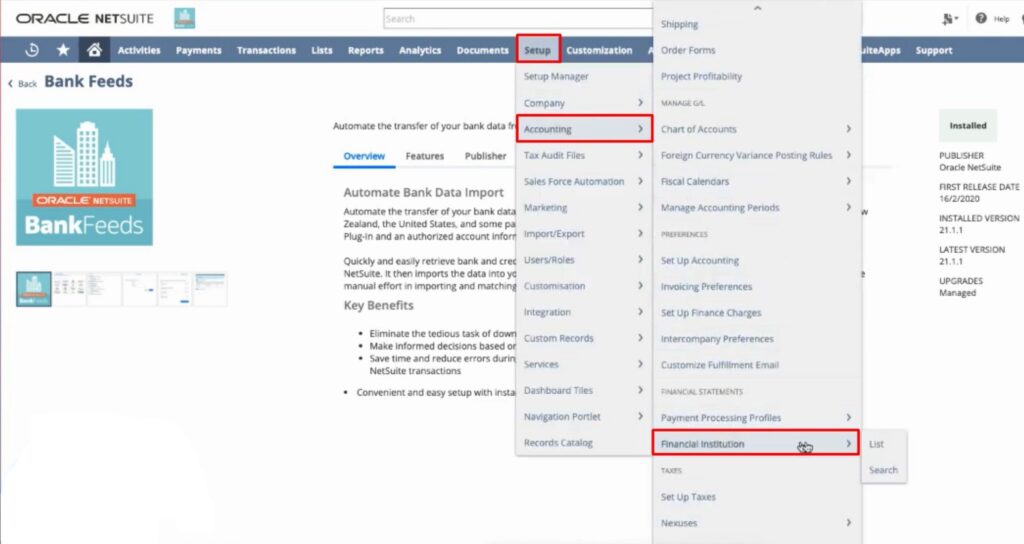
The Bank feed or the financial institution record can be accessed from the Setup Manager Menu
Set up 🡪 Setup Manager 🡪 Accounting 🡪 Financial Institution 🡪 List of Banks
The linked details of the bank, like the account number and other credentials, cannot be changed from the format profile.
The list of components that you cannot change is
- Bank feeds – Connectivity
- Bank Feeds Parser
You can map the right financial institution to the correct account in your account chart at your convenience. You can then sync it for a seamless transaction and update process.
The best part about the SuiteApp is, there are about 9000 banks that are available for the customers. If you use a Chase bank account or a Chase credit card, you can easily download the bank statements and other data without even creating a manual configuration.
Also, you can set up a schedule for bank feeds too. It is now fixed between 5 AM and 8 AM, and it depends on data traffic. The excellent matching rules help you map the transaction with the correct account in the chart, and you can get precise information daily. You can also move the old transactions to the ‘Excluded’ option. You can download the Bank feeds SuiteApp from NetSuite SuiteApp Marketplace.
Pre-Requisites to Use Bank Feeds SuiteApp
Though the Application is free, and you can NetSuite import bank transactions easily, you must have the below-mentioned details to use the Bank Feeds NetSuite app.
For you to install and get bank feeds, you require
- Online registration details of the existing financial institution(s)
- Server SuiteScript
- Client SuiteScript
- Custom Records
Additionally, you will also require Bank Login credentials to complete the setup.
Please Note: Your bank account might have a multi-factor authentication process to access information. You need to keep the information handy to import the data without any interruption. Keep the device in which you may receive the authentication code or the OTP. It is one of the prerequisites many customers will tend to miss.
Salient Features of SuiteApp
Bank Feeds SuiteApp gives information related to your banking transactions instantly. Also, the robust platform has clear information about every transaction that has happened over a period. Also, NetSuite prepares for a daily import, and you can get to see the daily transaction details from multiple accounts of yours.
- Bank Feeds SuiteApp is free.
- You can automate and import banking information from over 9000 financial institutions in the US and Canada.
- NetSuite automated bank reconciliation makes it easy without any reminders.
- Easy and Quick Installation of the app. The background process to set up the complete banking information takes 30 minutes.
- Auto-update of account information when any bank transaction occurs
Steps to Install Bank Feeds Suite App
Check for the prerequisites and get ready for the installation. Ensure that the Server SuiteScript and Client SuiteSript are enabled in your NetSuite Account. Also, check the banking information and verify if it is registered for online banking. At this juncture, you must know something about the new SuiteApp Market Place.
SuiteApp Market Place: It is an entire NetSuite library of SuiteApps. It is developed using the SuiteCloud Development framework and SuiteApp bundles. The SuiteApp bundler creates the SuiteApp bundles. The best part is, you can customize the app for your business, and you can use this through the customization settings.
Please Note: Before proceeding further, you must be aware that only people with administrator access or a person with permission to access a financial institution’s record can configure the Bank feeds integration. As the information is highly secured and sensitive, such move is appreciated by the customers too.
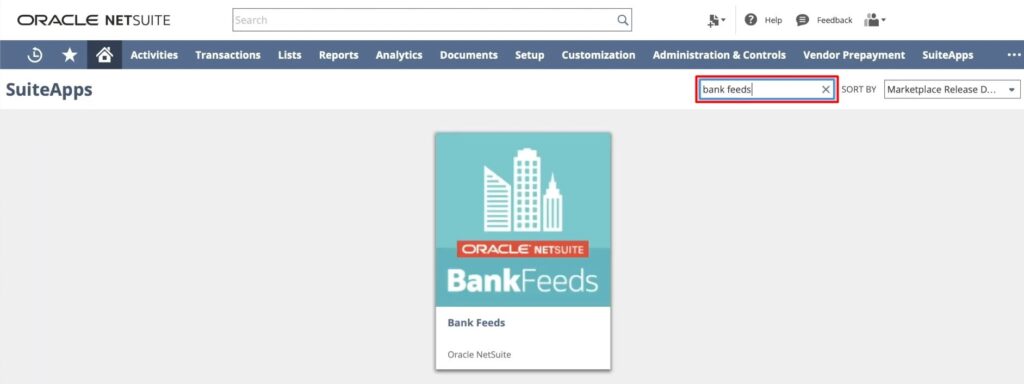
Step 1: Go to http://suiteapp.com/
You will find a search bar on the landing page
Step 2: Search for Bank Feeds Suite App with the help of the search bar
The title comes up as you search for it.
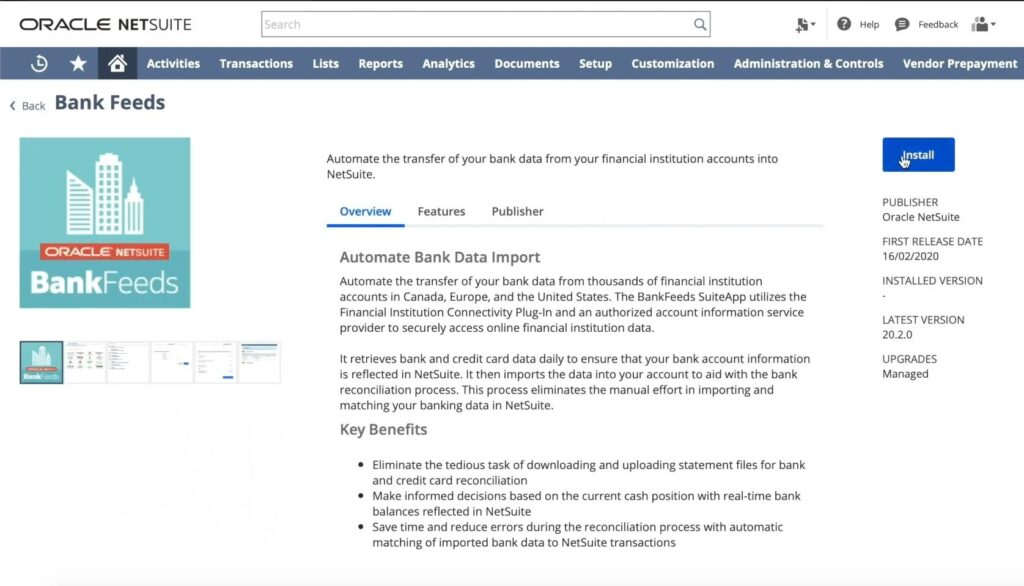
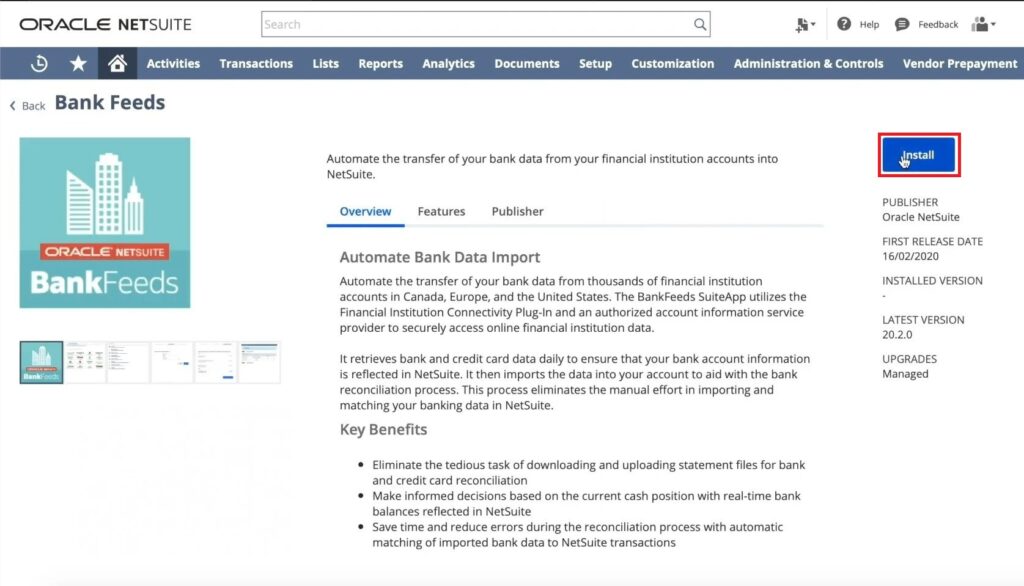
Step 3: Click on the Bank feeds SuiteApp title.
Find the ‘Install’ Button on the right-hand side. Click that to install the Application.
As you do this, the system takes 30 minutes or so to install. Also, the background process takes that much time to configure the application on your device too.
We have installed the SuiteApp, and let us proceed to configure a financial institution’s connection with the Application.
Steps to Configure a Connection to a Financial Institution
You can create personalized financial institution records using the NetSuite automated bank reconciliation format profile. Alternatively, you can also use the records provisioned by the SuiteApp to establish a connection with online banking services. The steps given below helps you to automate your banking processes and separate transactions completely.
For you to configure direct access to a financial institution, you can follow the path given below.
Step 1: Setup 🡪 Accounting 🡪 Financial Statements 🡪 Financial Institution 🡪 List
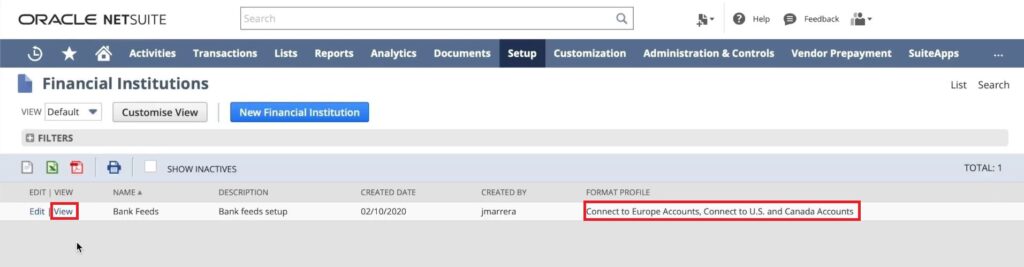
You can access the list only if you have the administrator status. As you do this, NetSuite will display the page that has the list of financial institutions.
Step 2: To Open a Financial Record
- If the Bank feeds financial information available and obtainable, then click on ‘View’ to see the data.
- If there is an already existing financial record from a financial institution, you can click ‘View’ to format the profile.
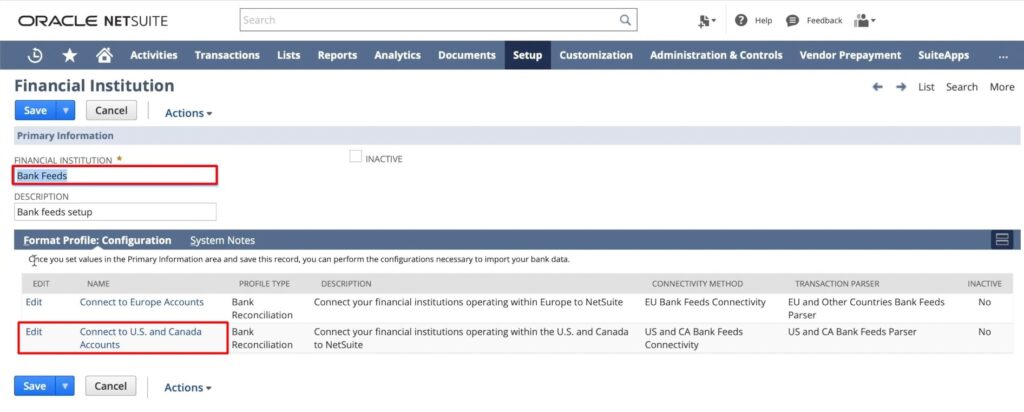
Step 3: Select ‘Connect to US and Canada Accounts’ – You will find this on the format profile configuration subtab, which is on the record. Now, you can configure the financial institution to the NetSuite based on the country of operation, whether it is the US or Canada. If you are planning to connect to European Accounts, you can still do that.
Step 4: Key in the Information
For you to format the profile, you need to enter the primary information. The data required to key in are
- Name – Please enter it in the Format Profile Field
- Description – it is necessary to specify the profile
While you do this, you will come across a connectivity method list. You can choose a plugin for the institution’s connectivity.
Step 5: Click on ‘Save’ and Save the Data
Some customers have the habit of checking the accuracy of the information; they link the same account twice. It is not required. NetSuite will import 60 days of complete data and prepare a daily import plan. One must realize that NetSuite matches bank data accurately if you have configured it correctly.
You can click on ‘Track your Status’ to access the status of a bank process too.
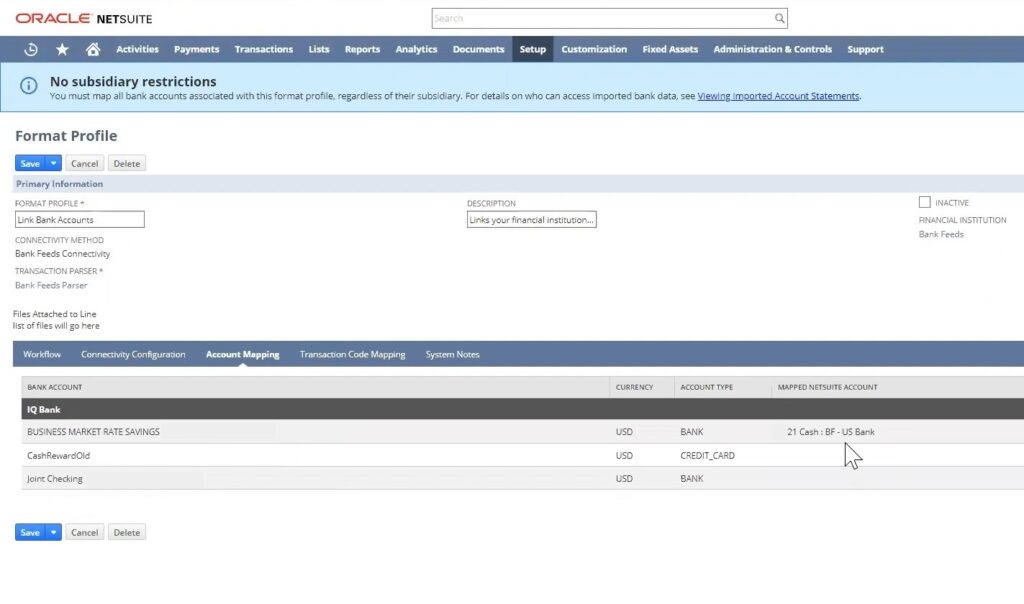
The configuration is still not done unless you link the GL account with the bank account that is configured in the NetSuite. It is essential, as it is the one that is responsible for automated bank data import process as well as retrieval. You can link the GL account by accessing the ‘account linking’ subtab.
How to Connect a Financial Institution in the US and Canada with NetSuite?
This information is given lucidly for a clear interpretation of the steps. Follow each of them without missing even a single element.
Step 1: Setup 🡪 Accounting 🡪 Financial Statements 🡪 Financial Institution 🡪 List
Step 2: Select ‘view’ by the Bank Feeds Institution Record on the Financial Institution Page
Step 3: On the Configuration Subtab – Select ‘Edit ‘by the connect to US and Canada Accounts – You must be done in the Format profile
Step 4: On the US and Canada Accounts Format Profile Page, Click on ‘Connectivity’
As you continue doing this, you will find a notice popping up to select ‘Accept and Agree.’ Especially if you are the first timer in connecting a financial institution to NetSuite, this pops up to read and acknowledge
Step 5: Select ‘Accept and Agree’
Step 6: Now, select ‘Get Started’
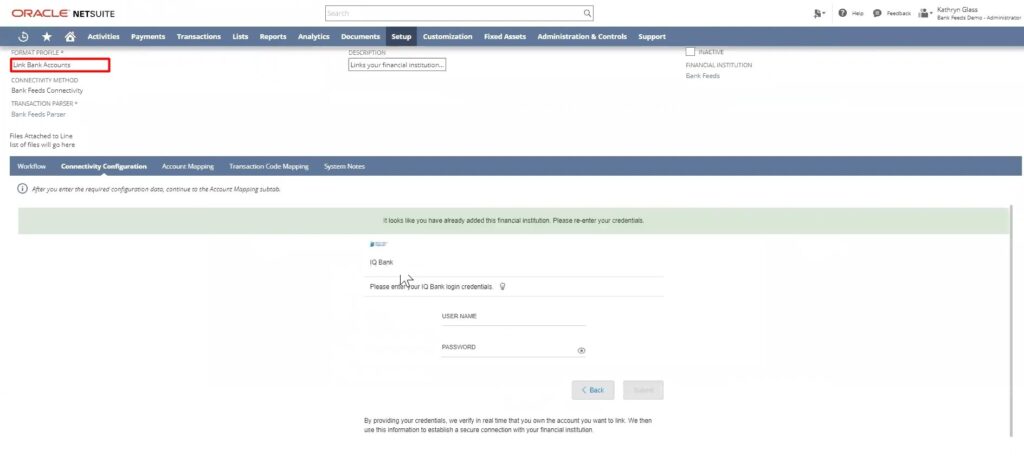
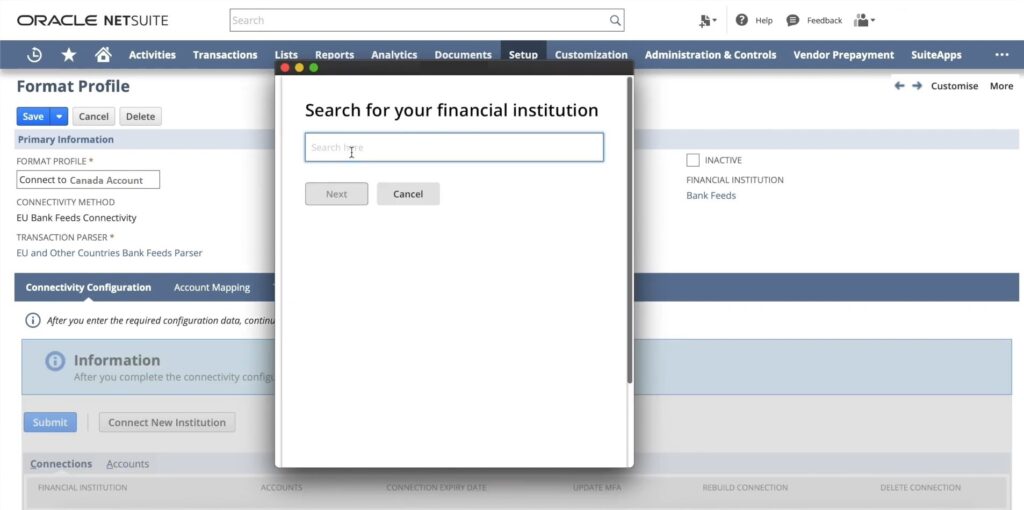
Step 7: Bank Information needs to be keyed in
- Select your Financial Institution from the list
- Enter your details and authenticate the same
- Select ‘Submit’
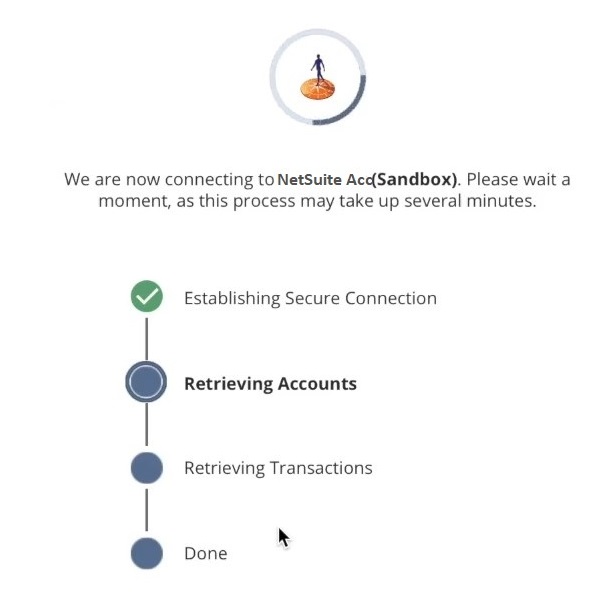
If the information you have entered is correct, you can NetSuite import bank transactions without hassle. If you have any additional authentication for your account, you must enter it too. NetSuite will now retrieve all the bank information, including your credit card accounts. You are setting up multiple transactions that have happened through the financial institution in one platform.
Step 8: All the information about that financial institution is connected to the NetSuite account. If you are planning to link any other bank account apart from the one that you have completed, then click on ‘Link Another Institution’ and follow the same steps as mentioned in this column.
Step 9: Once the information is linked to the NetSuite Account and the data configured, click on the ‘Account Linking’ Subtab to facilitate the GL account linking process.
Though the time taken to connect the financial institution with the NetSuite is less, the authentication process takes longer. If you attempt to key in the wrong credentials, then the time taken to configure may exceed too.
Multi-factor Authentication Accounts – How to Manage them
The Bank accounts operating in the US and Canada might demand 2FA or MFA to access sensitive information about your transaction and communication. 2FA and MFA might have OTPs, or even limited-time log-in for retrieving information might cause trouble as you download a few banking information through NetSuite. The MFA tokens vary from bank to bank. More importantly, the import of bank data might fail if the authentication is not successful.
At the same time, the credentials you have might be active for only a few sessions. Check the history of Bank data import and learn which data requires multiple authentications. Of course, Multi-factor authentication is required to have a secured banking transaction. However, you need to be a bit vigilant as NetSuite might fail to import the data just because of authentication failure.
Bank Feeds SuiteApp – Limitations
It is better to understand a few limitations and shortcomings the Bank Feeds SuiteApp has.
1. Banks with Country of Origin
Though the Financial Institutions can be configured in the App, the banks belong to certain countries can only be connected. NetSuite bank feeds Australia is one among them. The list of countries from which the banks can choose the bank is given below.
- Canada
- Countries in Europe, including the United Kingdom
- Hong Kong
- Indonesia
- Malaysia
- New Zealand
- Philippines
- Singapore
- Thailand
- The United States
- Australia
2. Limited Multi-Language Feature
Bank Feeds SuiteApp support multi-language feature in the NetSuite. However, based on your format profile configuration, a few limitations apply.
- In the configuration setup, under the connectivity configuration subtab of the ‘Connect to US and Canada’ Accounts – to link accounts basically, the format profile page supports only the English Language.
- Similarly, for the Configuration setup for the European Banks, the format profile supports the multi-language feature. However, specific legal terms of the bank websites in different languages may not be supported by NetSuite. In such cases, the text shall remain in English or stay in the same language as what the website has.
3. Bank Data Import Limitations
Though auto-import of bank data is available daily, if you initiate manual data import, there is a shortcoming if you attempt to download twice within 30 minutes. The app does not allow you to do so. You must wait for 30 minutes and then initiate the manual import again.
4. Bank Feeds Integration of APAC Countries’ banks
The import of bank data from the banks in APAC countries is 4,49,500 transactions per connected account. If you have another account linked to the NetSuite, then the NetSuite import bank transactions limit is reduced by 500.
For example, if you have a savings bank account and a checking account in the bank of APAC countries. Then the transaction limit is set to 4,48,500. It is the case with auto-import; you can still manually initiate the import process if the maximum transaction limit is reached.
5. Limited Transactions for Small and Medium-Sized Businesses
SuiteApp is ideally made for small and medium-sized businesses. However, there is a limit for the transaction with the financial institution. It can process up to 10,0000 transactions with a maximum of 20 accounts connected to NetSuite. If this number exceeds, then it is suggested downloading
- Auto bank statement import SuiteApp or
- Bank Statement Parser’s SuiteApp
Bank Data Import – How is it done in Bank Feeds SuiteApp?
There are two ways to import the bank data. One is the automated mode, and the other is manual initiation. Both are equally important depending on the circumstance.
Automatic Data Import
You require the financial institution connectivity plug-in to auto-import the bank data. As such, the plug-in connects with your bank and automates the following
- Inbound Communication
- Cash Balance Reporting
- Bank Statement Download
You can automate the process to generate daily reports of those mentioned above.
Please Note: The Financial Institution Plug-ins work in JavaScript file with .js extension, SuiteCloud IDE, text Editor, or an alternative JavaScript IDE to produce the script file. You must first create the script file and other utility files to make the plug-in accessible.
Follow the steps mentioned below to enable the plug-in
Step 1: Choose Setup
Setup 🡪 Company 🡪 Enable Features
You will find SuiteCloud Tab.
Step 2: Select Client SuiteScript and Server SuiteScript
Step 3: Click Save
The financial institution connectivity plug-in interface includes the following
- Listed Functions
- Object Functions
- Interface Objects
NetSuite conveniently provides you with the daily report, and it can automate it by arranging the format profiles. These format profiles allow the connection to financial institutions to receive data. It can do it only in the administrator role. Once the formatted profile is saved, you can receive the data daily.
Manual Data Import
Alternatively, NetSuite Implementation Services help you to initiate manual import of the bank data. It can do it for accounts with a minimal transaction or planning to get a consolidated report or for any credit card accounts etc. The digital download of bank data is highly secured, and the app itself shall delete the information once it is downloaded. You can import the file using
- Configuration Settings
- Parser Settings
The files format that is supported are given below
- BAI2 – Bank Administrative Institute Version 2 – TXT with UTF-8 encoding
- CAMT.053.001.06 XML with UTF-8 encoding
- CSV with UTF-8 encoding
- QFX (Quicken Financial Exchange)
How to Track Process Status in Bank Feeds Suite App
It is a relatively simple execution process. Once you have initiated a manual import of bank data, you can click on ‘Track Your Status.’ It will lead to the page where the statement files are present. Once the import is done, you can view the same.
It can click the same link again while you set up the configuration for the first time too. The NetSuite SuiteApp downloads the last 60 days’ data once the configuration is successful.
At the same time, manual import requests cannot be given twice within a 30-minute duration. It shall decline the request. You cannot track the status of declined requests as well.
Bank Reconciliation Process
NetSuite’s bank reconciliation process is a fabulous feature for the US and Canadian banks. However, to use the same quality for the banks in other countries, you require a plugin. But, it is worth it. This column will guide you through setting up the same.
Step 1: Update Bank Reconciliation Process in NetSuite
Choose Setup 🡪 Accounting 🡪 Chart of Accounts

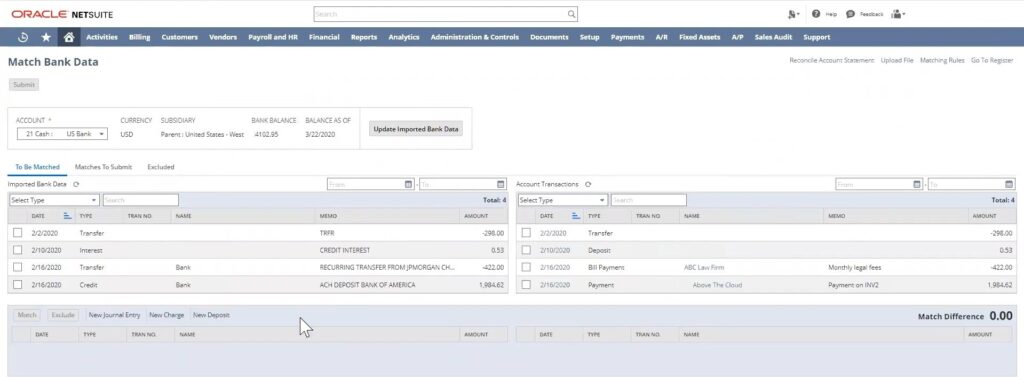
Step 2: You will find the list of banks connected to NetSuite. Click on the bank that you would like to set up the NetSuite match bank data.
Now, Use the match bank data and reconcile the bank statement pages.
Step 3: Click on ‘Save’
Please note: As you enable ‘Use match bank data and reconcile account statement pages,’ the bank account will not show up like the old method.
Step 4: Download the BAI2 file from the bank portal
Step 5: Change the file extension to .txt on your computer
Step 6: Click on ‘Save’
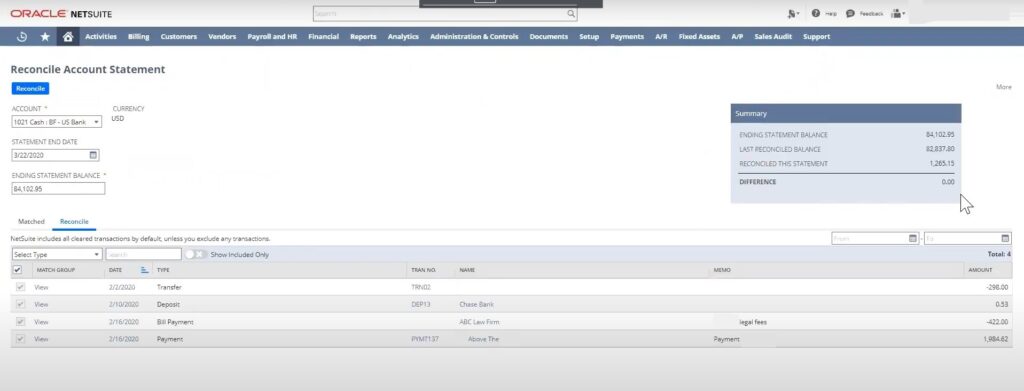
Now, you are open to upload the file to the NetSuite as well as match bank data. The data is processed, and you can create reconciliation rules to automate the same.

NetSuite Solution provider has given the businesses a good advantage of tracking their financial aspects regularly. It helps them make informed decisions. Also, it can reasonably manage cash flow and save factors through the auto-update features of the app. This app was created keeping small and medium-sized businesses in mind; however, the developments are suitable even for the more giant corporations.