
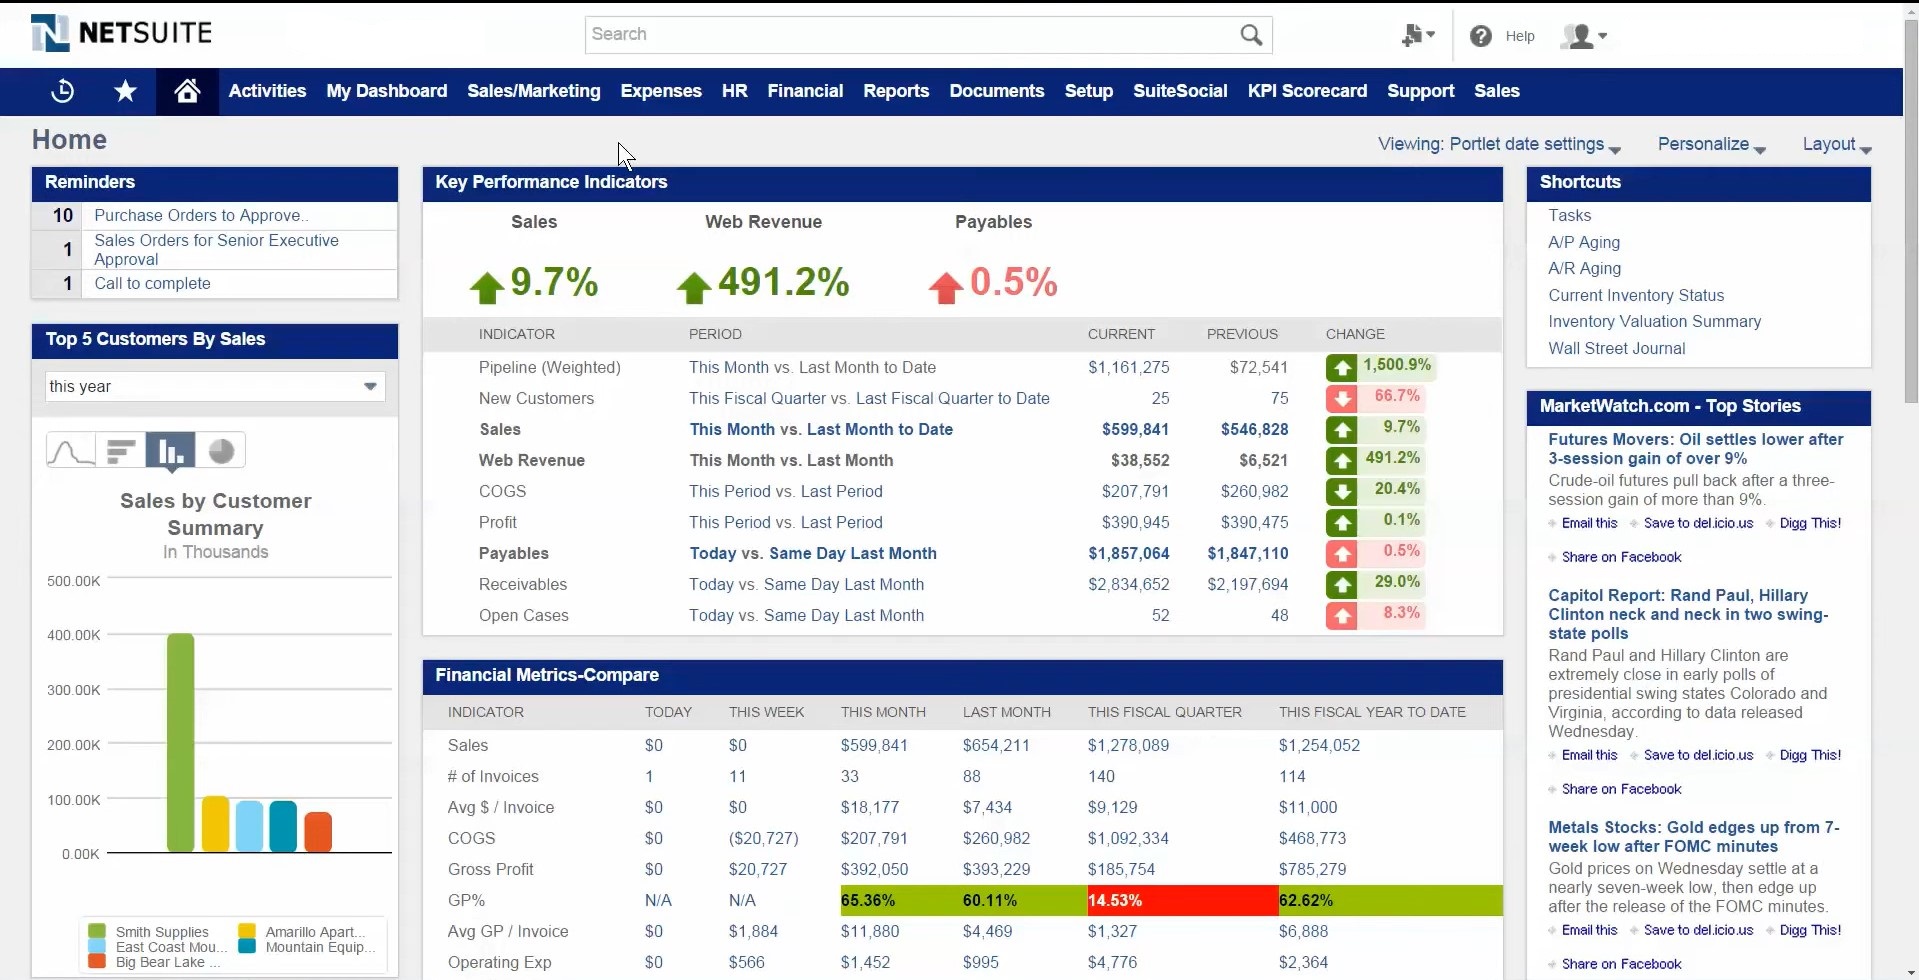
A dashboard in your NetSuite user interface is a collection of tabbed pages. It is designed to dynamically show your dashboard data and provide immediate access to raw data, KPIs, trend graphs, workbooks with charts, and reports. Our comprehensive NetSuite Dashboard guide covers everything from creating custom dashboards to understanding key performance indicators.
Each user can design a special dashboard layout to view the precise facts required to carry out their task under tabbed pages known as the center. Based on the user’s job, the center offers the pages and connections each position requires to carry out its regular responsibilities. Additionally, it smoothens the company’s workflows and the integrated procedures with dashboards, adding up extra business advantages.
What Is A NetSuite Dashboard?
NetSuite Dashboards provide a way to assemble all of the data from an organization in a safe spot. Using data visualization tools like charts and graphs, dashboards are intended to provide a thorough picture of business performance. With the exception of the documents, setup, and customization pages, every page you encounter in NetSuite has access to the dashboard. To make better, quicker, and more accurate judgments, edit data quickly and see your company’s entire picture in real-time.
NetSuite has a default dashboard setup for each page that users may modify to suit their needs. Administrators can, for instance, distribute customized dashboards for one or more pages to a group of users, so they all have access to the same user experience. It helps boost performance in the following ways:
- Reduces time spent building reports
- Builds a single source of truth
- Set more actionable goals
- Holds your team accountable
- Improves team communication
- Automates tedious tasks
- Reduces human error
- Analyzes data faster
Guide To NetSuite Portlets
Numerous content kinds are available in NetSuite for dashboard portlets that can be assessed as follows:
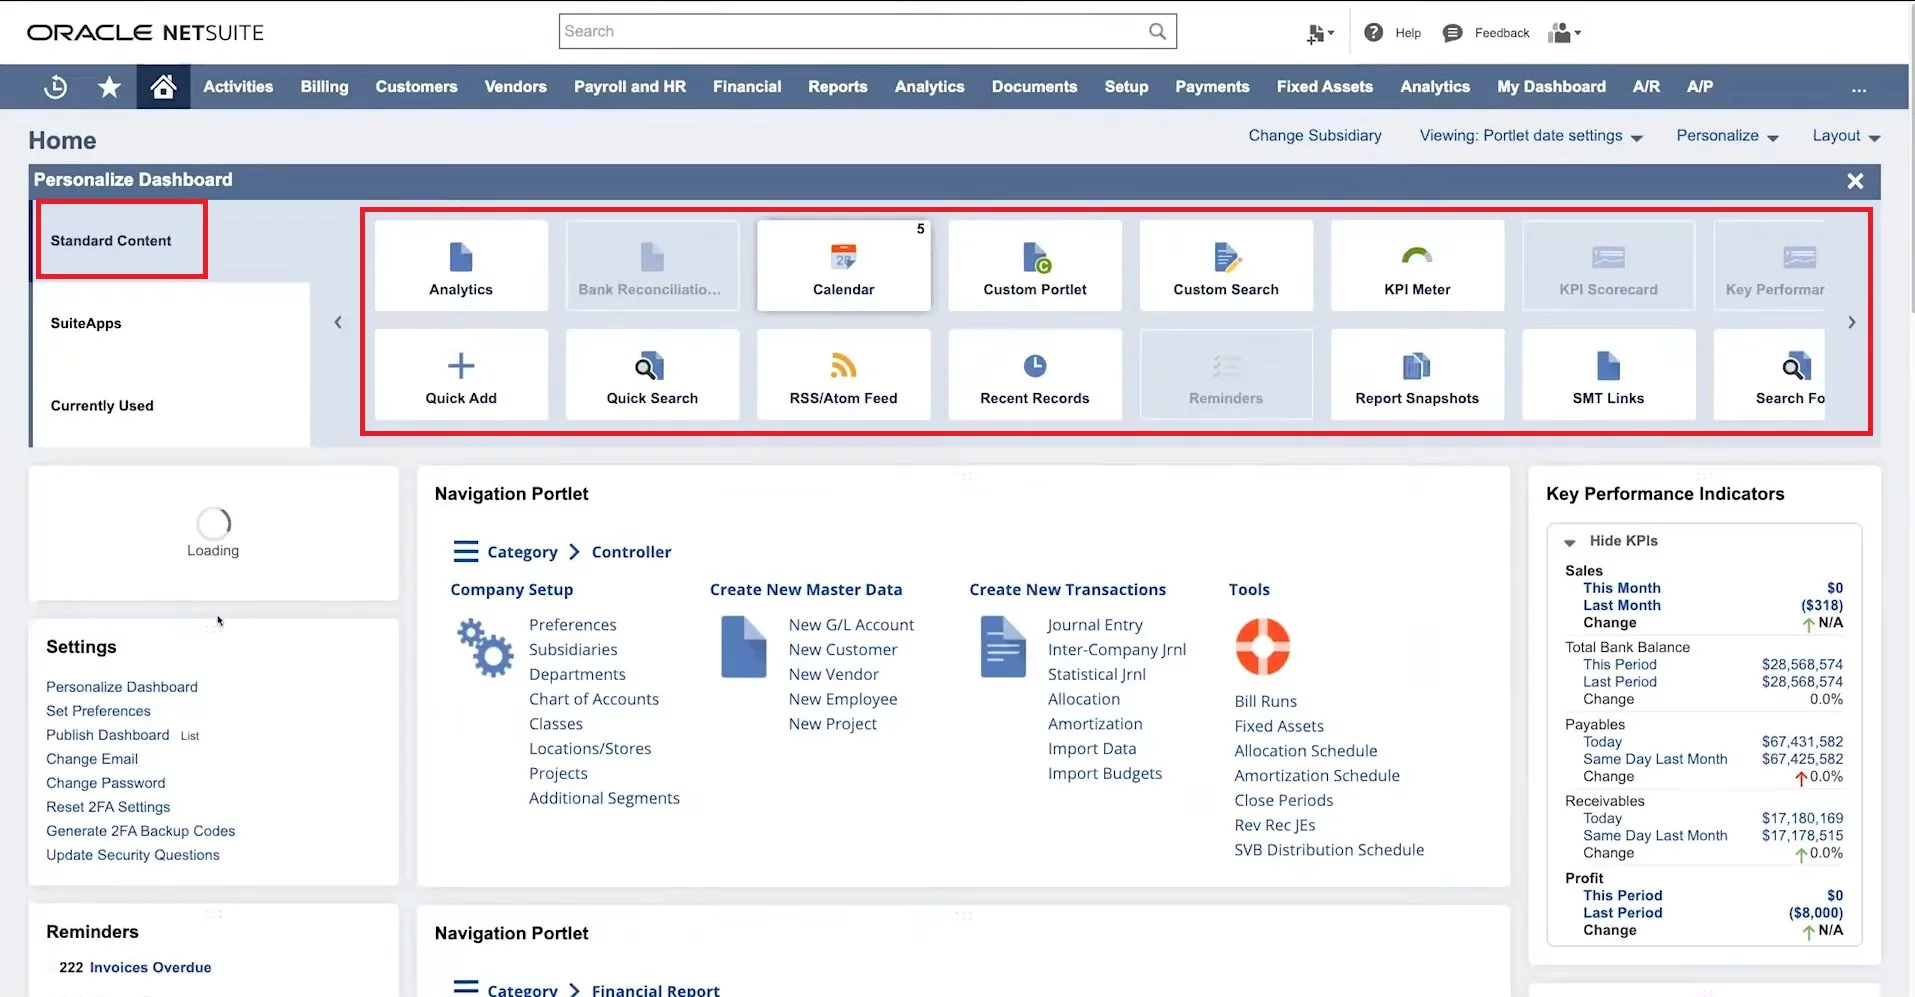
- Click Personalize Dashboard in the Settings portlet or Personalize in the top right corner of the page to view the content that is accessible on that page.
The Personalize Dashboard panel shows the content you may add to your dashboard on the Standard content page. However, as a user – you must know that the controls are hidden until you move your pointer over the portlet.

Even when a portlet appears for the first time on a dashboard with a portlet, it loads extremely slowly. The NetSuite usually provides a popup advising to minimize the portlet to speed up the loading of the dashboard.
- To minimize the portlet, you must click on the title bar. When you move your mouse over, the title bar transforms into crossed arrows.
- Next, to enlarge the portlet’s content, click the title bar once more.
- A Refresh indicator is included in portlets containing content derived from recent data.
- To refresh the portlet and access fresh data, click on the Reminder portlet’s Refresh icon.
- Some portlets, namely, the Trend Graph, Report Snapshots, List, Custom Search, Tasks, and Phone Calls portlets, include an option to expand to a full-screen view.
- The search results for the List, Custom Search, Tasks, and Phone Calls portlets are shown in a larger number of columns and rows in the full-screen view of the portlet.
- Clicking the double arrow symbol will maximize the portlet into full-screen mode. The Double Arrow symbol is at the portlet’s upper right corner.
Setting Up NetSuite Dashboard Portlets
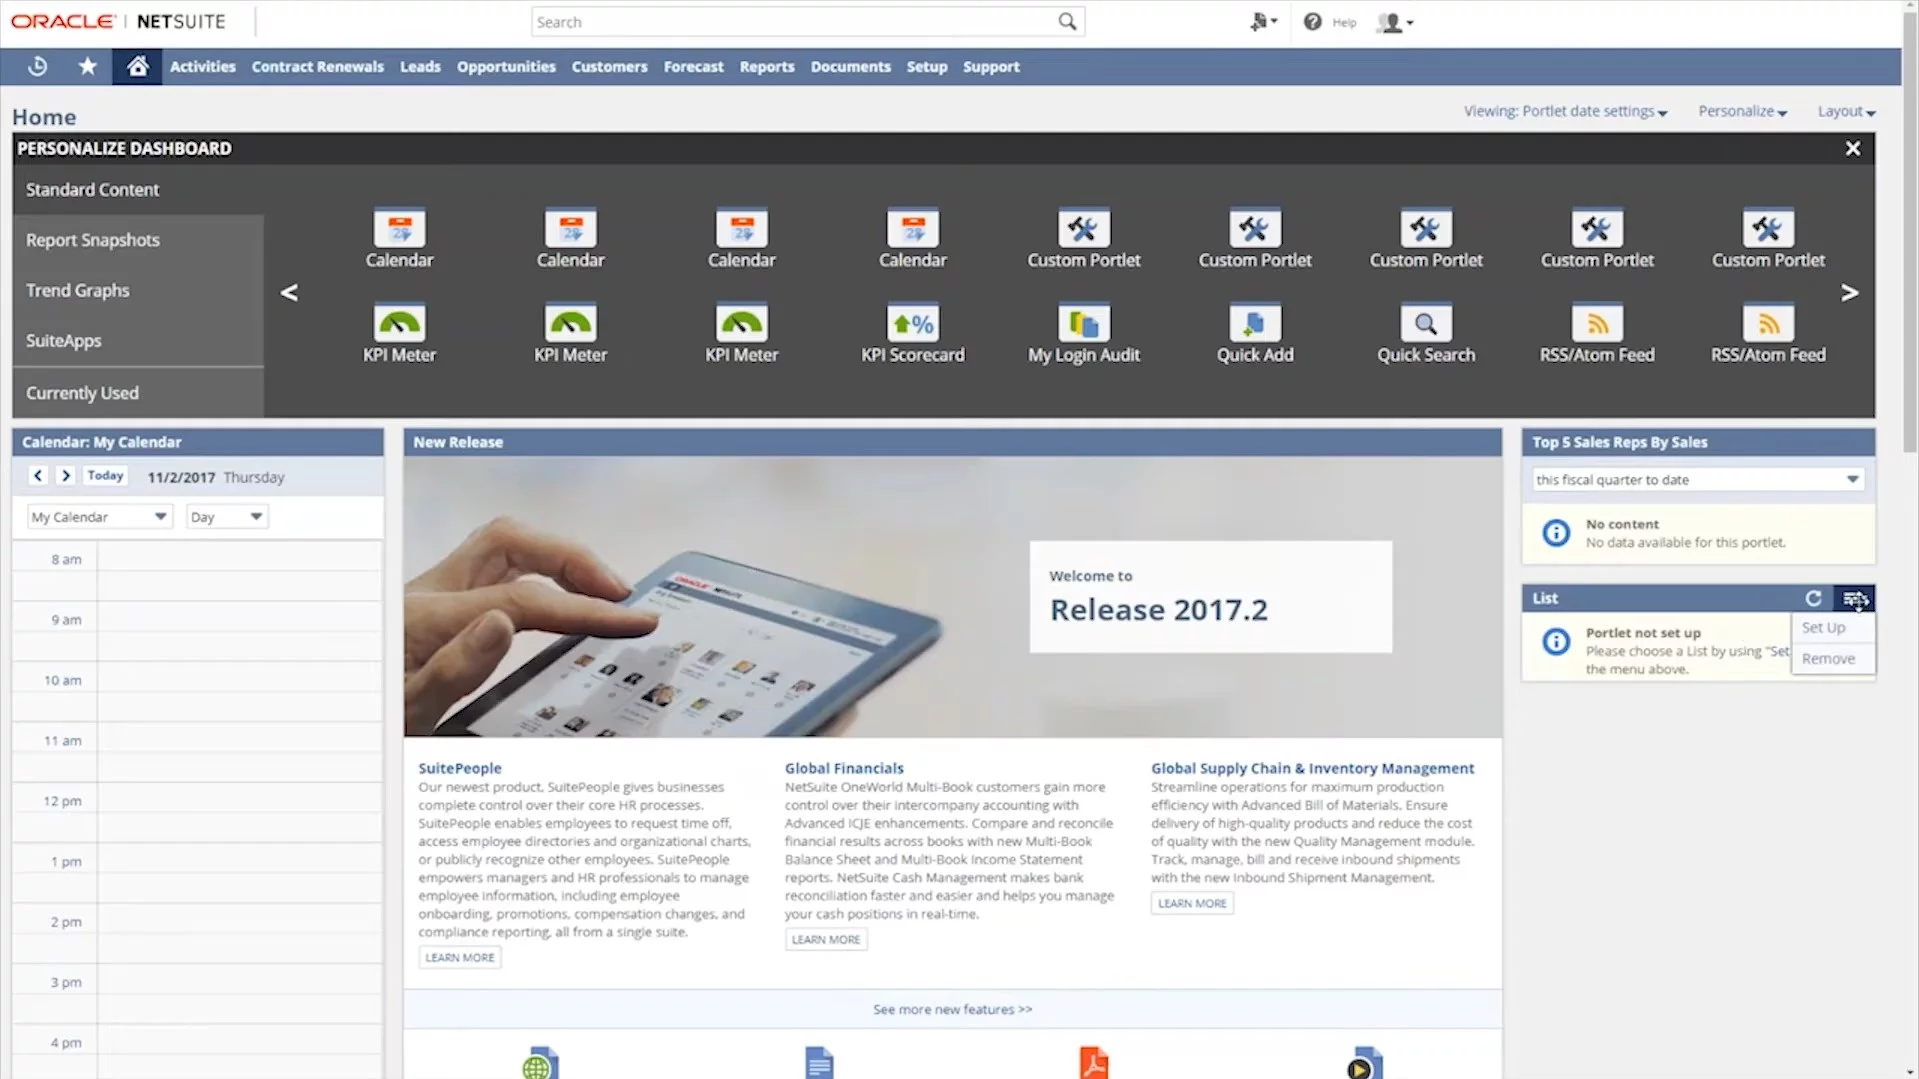
You may check the information and layout for each portlet as you add them to your dashboard. Since portlet setup actions must be completed after adding portlets to a dashboard, portlets initially display default data or no data.
- A Set Up link may be found on the menu of the majority of portlets.
- A popup box that opens when you click Set Up allows you to specify the data and layout.
- The menu is next to the title bar on the right: You can select the portlet content from dropdown menus in some portlets, such as the KPI Meter.
It should be noted that a portlet’s data and layouts are only customizable if it has a drop-down list or a menu containing a Set Up link.
Most portlets’ configuration choices are self-explanatory. The following list provides quick pointers for configuring various portlets:
1. Analytics: Click Set Up to choose the workbook visualization you wish to display from the available options (chart, pivot table, or table view). After selecting the visualization, you may specify layout settings like portlet size and title.
2. Calendar: Choose a calendar to display from the list. Your calendar is visible by default.
3. Custom Portlet: Select the source file for the SuiteScript results by clicking Set Up.
- Dashboard Tiles: Select Dashboard Tiles in the Source area by clicking Set Up.
- Navigation Portlet: Select Navigation Portlet from the Source box by clicking Set Up.
4. Custom Search: Select the stored search and the number of results displayed by clicking Set Up. Additionally, you can select whether to dig down into search results on the current page or a new one and give your portlet a unique title. You can decide whether to allow inline editing of search results if the functionality is enabled.
5. KPI Meter: Choose a KPI to display from the drop-down list. To choose settings for date ranges, comparison, and highlighting, click Set Up.
6. KPI Scorecard: To choose a KPI scorecard and specify layout settings, click Set Up.
7. Key Performance Indicators: Select standard KPIs or custom KPIs based on saved searches by clicking Set Up. You may choose comparison and highlighting choices after choosing the KPIs.
8. List: To choose the kind of record and the number of records to display, click Set Up. Enable Inline Editing to modify records directly in the portlet.
9. Audit of my Login: Click Set Up to configure display settings to track your personal login activities.
10. Phone Calls: Select the number of records to display by clicking Set Up.
11. Project Tasks: Add a List portlet to your dashboard, and choose Project Task as the List Type under Set Up in the portlet menu.
12. Quick Add: To choose the kind of record to be added, click Set Up.
13. Quick Search: Select a field name from the Search For a drop-down list and input keywords in the portlet’s text box after clicking Set Up to specify the kind of records to search.
14. RSS/Atom Feed: Select a feed and configure display settings by clicking Set Up. You can pick a custom and input the URL of another feed if you don’t want one of the essential feeds that NetSuite offers.
15. Reminders: Select the sorts of reminders you want to receive and how many days in advance you want them to appear by clicking Set Up.
16. Report Snapshot: Choose a date range for the graphed data in the report snapshot. Choose a display type and other layout parameters by clicking Set Up if it’s an option.
17. Search Form: You may show a search form in a portlet on your dashboard if one of your stored searches is chosen as the preferred search form for a specific record type.
18. SMT Links: Choose a domain and website to examine or update using SMT Links.
19. Shortcut: To reorganize the list of current shortcut links, select Set Up under Shortcuts. If you know the page URL, select New Shortcut to add a shortcut. If you do not see the URL, go to the website and choose to Add to Shortcuts from the More list.
20. Tasks: Select the Basic view to show tasks assigned to other users in your system.
21. Trend Graph: Select up to 3 KPIs to graph and layout choices by clicking Set Up. Click on the period choices in the portlet to alter the X-axis scale of the graph.
How Do I Create A Dashboard In NetSuite?
Here are some of the ways in which you can create a NetSuite KPI dashboard.
Choose a Layout
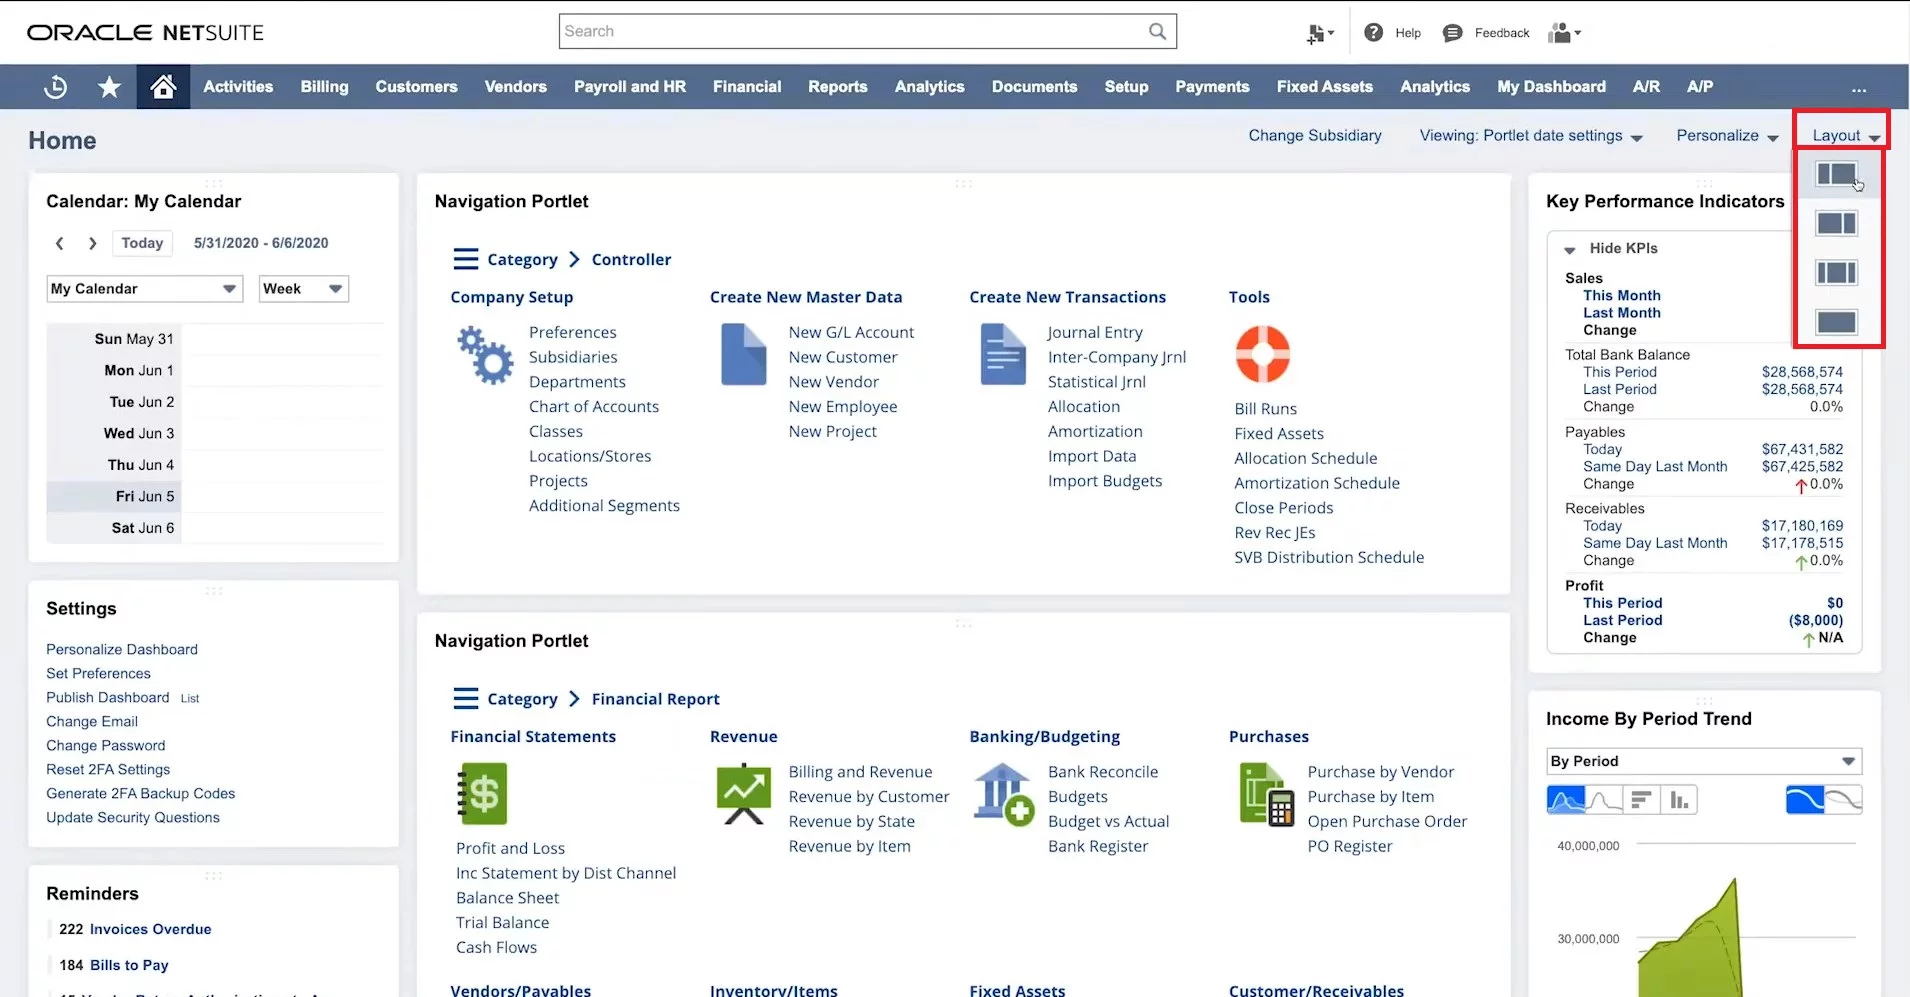
You should go to the upper right side of the homepage and click on layout. You would see a drop-down list appear with several layouts.
Select Content
If you want to add or erase portlets, go to the upper right-hand side of the homepage and click on personalize. The left side of the drop-down menu depicts several varieties of portlets that can be added to the dashboard.
Hover over the cursor over the upper right side of the portlet to expose the drop-down menu. You have to click Set Up. After the setup has been selected, various fields would appear and need configuration.
How To Publish A Dashboard In NetSuite?
The NetSuite dashboard training would help you to be aware of the various ways of publishing a dashboard in NetSuite.
Here are some of the ways through which you can publish a dashboard in NetSuite.
- Ensure that you are logged in to a role with the center type. Note that you would also require role permission to be able to publish the dashboards. You should contact the system administrator for information about granting permission.
- Configure the dashboard you want to publish. You can publish one or several tabs at a single time. This would include creating the portlets and aligning them in the manner you desire. If you publish a dashboard comprising a custom center tab, ensure that the roles you are publishing have access to the custom center tab.
- Find the public dashboard from the home screen in the settings portlet.
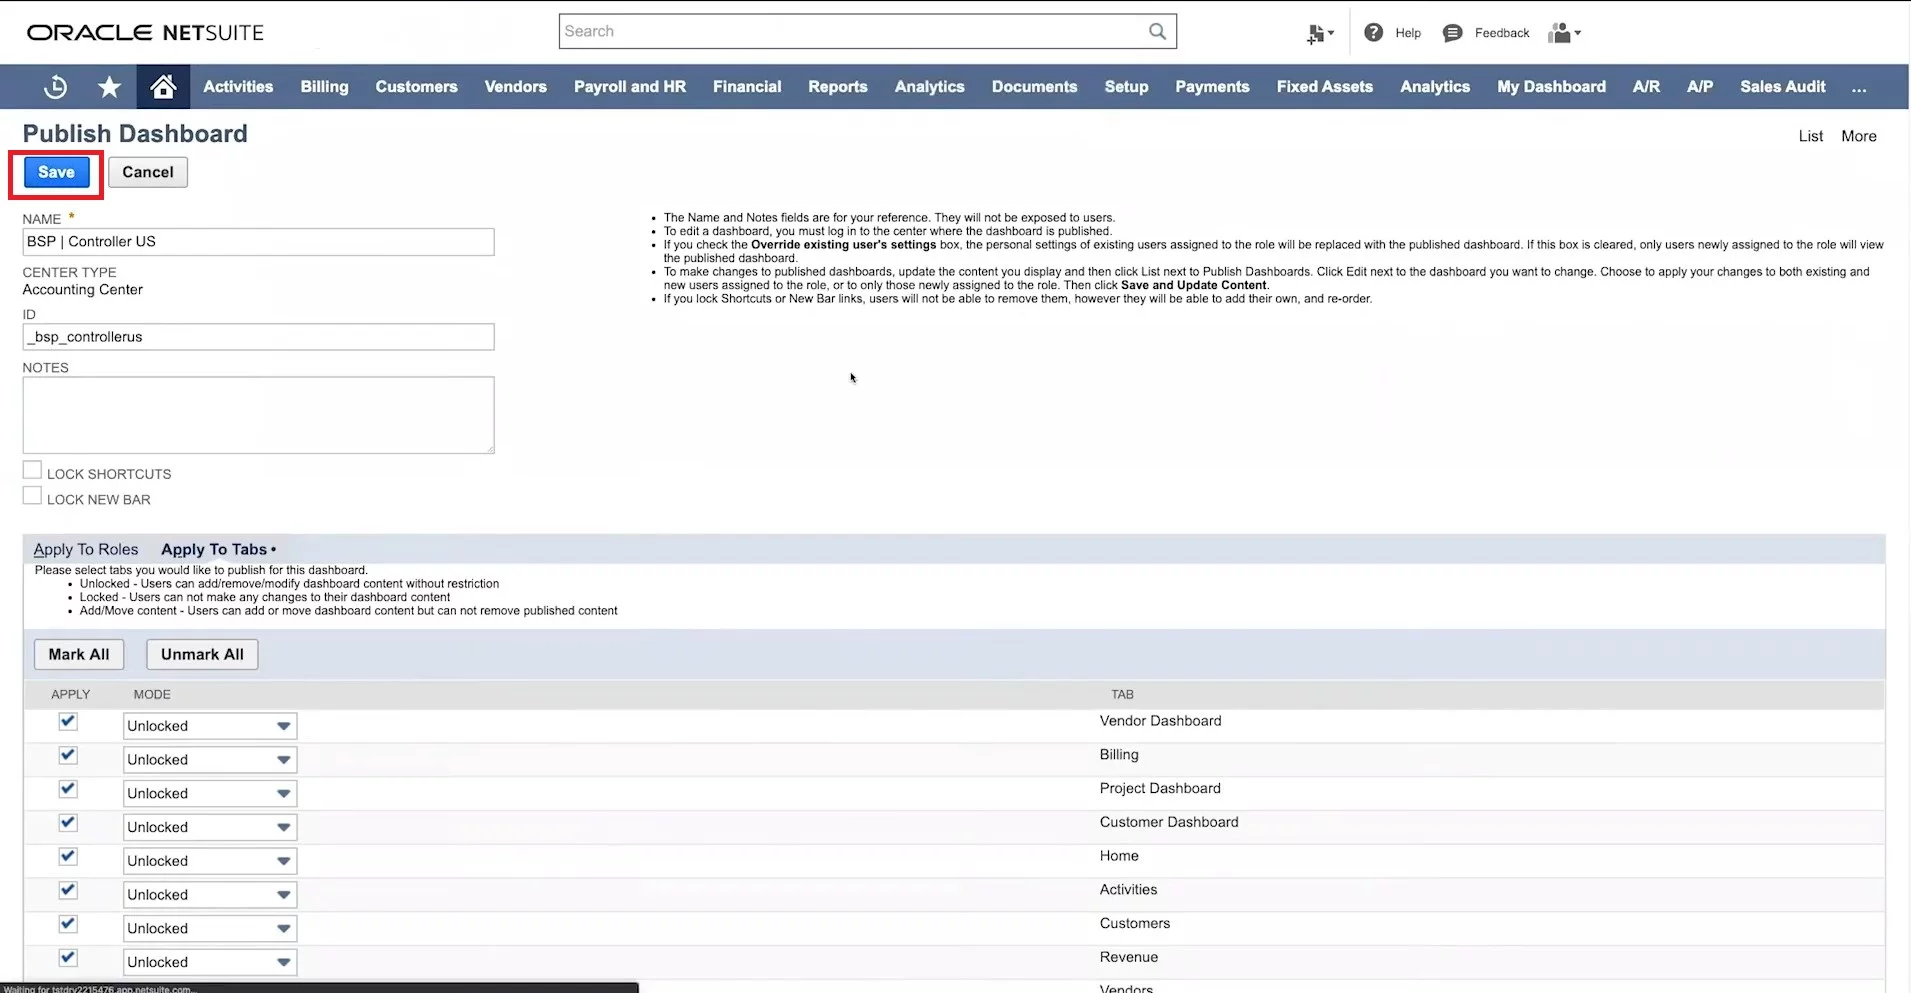
- Provide the published dashboard a name and enter dashboard-related notes.
- In the “apply to tabs link”, choose the tabs you wish to push to users with the published dashboard.
- After configuring all the settings, save them. NetSuite would now publish the dashboard to the selected roles.
Personalizing Your NetSuite Dashboard
Well, NetSuite dashboard customization is one of the important aspects. Here are some steps with which you can personalize the dashboard.
- Click on Personalize, located at the top right corner of the home screen
- This would open the personalize dashboard drop-down menu or the portlet menu
- Drag and drop the portlet of your choice to the screen
How Do I Add A Tile In NetSuite?
Here are some of the ways in which you can add NetSuite dashboard tiles.
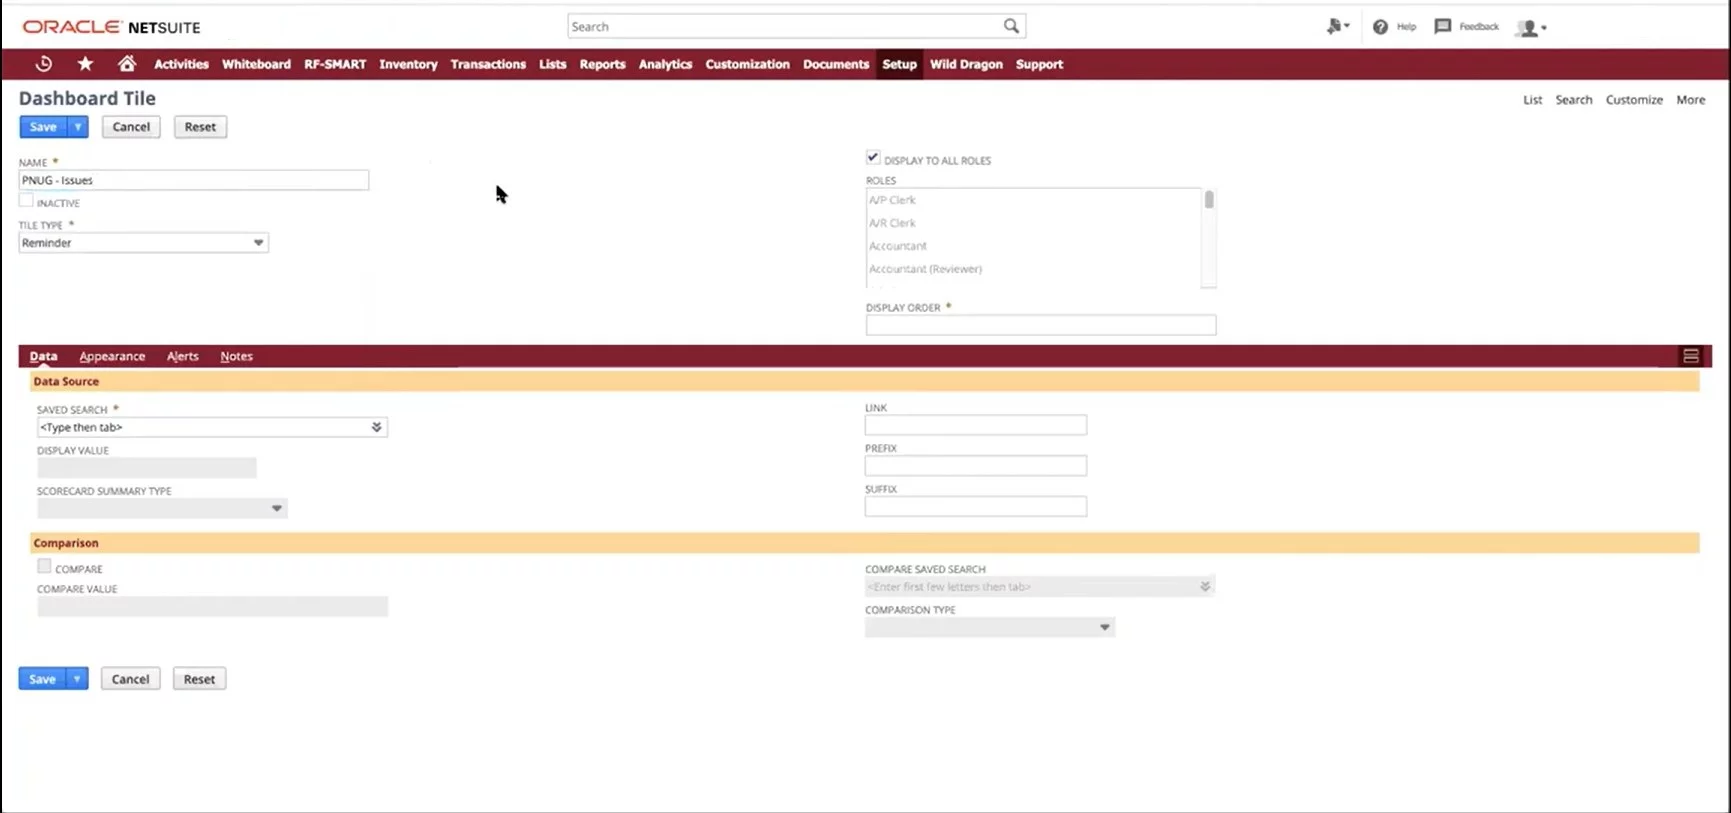
- You have to navigate to Set Up, then dashboard tiles, manage dashboard tiles, and new.
- On the dashboard tile page, you have to specify values for fields like name, tile type, display, display order, and roles.
- On the data sub-tab, you have to specify values for fields like display value, link, prefix, and suffix.
- In the next step, you have to modify the appearance of the tile.
- Click on save
- You should repeat the same process for each dashboard.
How To Change NetSuite Dashboard Color?
To be precise, many people want to change the color of the NetSuite publish dashboard. It is quite normal that you want to customize the NetSuite dashboard based on your preferences. If you want to change the color scheme, click on the home icon on your dashboard. After that, you have to navigate to the set preferences menu. You can alter the color scheme from there by clicking on the appearances menu.

How To Apply Changes To Published Dashboards?
Depending on the users’ assigned responsibilities, when you make changes to a personalized dashboard that you have published, you can apply those changes to all or part of the users’ dashboards for the published dashboard.
Step 1: Log in using your role when you publish the dashboard if you want to alter it.
Step 2: Adjust a dashboard or dashboards, you have already published to other roles.
Step 3: Go to your home page and click List next to Publish Dashboard in the Settings portlet.
Step 4: To reapply for different positions, click Edit next to the dashboard you wish to change to.
Step 5: Depending on their roles on the Publish Dashboard page’s Apply To Roles subtab, you may apply your modified dashboard to users’ dashboards.
Step 6: Check the box in the Override existing user’s settings column for each role you wish to apply to the modified dashboard.
This box needs to be checked immediately if it was checked for a role when the dashboard was first released. You must check this box once again to apply the modifications to that position.
Step 7: Select “Save and Update Content” from the menu.
A pop-up notification will show up. By selecting OK, you may publish the dashboard with the tabs and limits that were initially chosen, or you can click Cancel to modify the tabs and restrictions.
Users given the chosen roles will see your modifications to this published dashboard. For modifications to be apparent, they might have to log out and then log back in. Users may need to manually reload the website for each new dashboard, depending on the caching options in their browser.
Publishing A Dashboard To Different Roles
Usually, you should go for NetSuite consultants to know more about dashboards as they have extensive language. Here is how you can publish a dashboard to various roles.

- Log in with the role you were using when you first published the dashboard
- Implement changes to one or more pages that are tabbed and save the settings
- Go to the home page, and then in the settings tab, click on the option named list located next to publish a dashboard
- Click on edit, which is next to the dashboard you have just changed
- On the apply to roles option, you can apply your altered dashboard to the dashboard of the users

So as you can see, various aspects of customizing the NetSuite dashboard can be difficult to manage in real-time. By opting for a NetSuite Implementation partner, you can ensure that your dashboard stays intact and organized to a greater extent.
Read More: A Quick Guide To NetSuite Search Formulas & Methods